How to Write a Module for OXID eShop: Display “You will save x %” on the Product Details Page
Upfront: although I probably have a good technical understanding I am not a software developer. So it’s a pleasure to thank my mates @tabsl, @vanilla_thunder, @jkrug @l3k, @stasiukaitis-saulius and especially @DSB for the patient, almost friendly help while writing this OXID eShop module sample, and letting me understand what each line of code does. My thanks also goes to my mate @stew who usually corrects my English 🙂
This example is based on the German blog post “Ersparnisanzeige Artikelpreis und UVP”, and I thought it was a brilliant idea to write a more comprehensive tutorial in a workshop style, showing how to develop a rather simple functional extension for OXID eShop version 4.7 and 5.0 in English. Also, some tutorials about this topic we’ve already had, became a bit dated in the meantime as the module system in OXID eShop is about to be consistently improved.
Alright, let’s start getting some practice in 🙂
Create your vendor directory
First off, go to your OXID eShop installation, find the folder /modules/ and add another folder with your initials inside, in my case I used /mst/ (for Marco Steinhäuser). Of course you can also use your company name or something else – just try to be unique in the OXID sphere. From now on, you can place all of your self-made modules into this folder.
Meta data for your modules
Inside this folder, generate the file vendormetadata.php. As it is not used yet (but will be in one of the next OXID eShop versions) you can leave it empty for now.
Besides this file, inside your vendor folder, create a directory with the name of your extension (I chose /mysaving/ in my example) and move it into it. Please note that the folder name must be the same as your module’s ID.
Optionally generate a thumbnail image that describes your module visually and upload it into the module’s root folder; you may name it thumb.png. Take care, you already resized this thumbnail into the right size – it will be shown in the administration panel of your module’s users.
Let’s generate a metadata.php file now and insert some basic information. Please note that there has to be some mandatory variables like id (must be the same like the module’s folder name we generated before), title and extend so the program knows which class you want to extend and where to find your own code. But of course, you can also have other variables inside the array of this plain PHP file.

On this Wiki page you’ll find all information about the meta data file and the variables that you can use:
http://wiki.oxidforge.org/Features/Extension_metadata_file
Implementing the program logic (functionality)
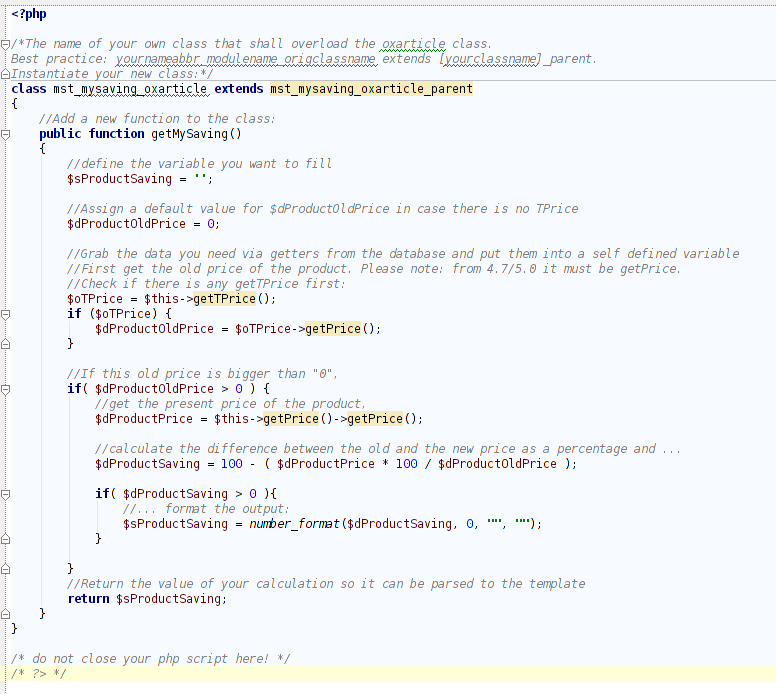
Depending on the method or class you want to overwrite, build the directory tree for your module following the conventions of the shop itself. In my example I want to overload the class oxarticle (which can be found in /application/controllers/ in the shop directory) by my own class mst_mysaving_oxarticle. That’s why I generated the file mst_mysaving_oxarticle.php in /modules/mst/mysaving/application/controllers/, BTW: it is recommended and best practice to use a naming convention like yournameabbreviation_yourclassname_originalclassname for trace-ability.
The rest is a bit of programming magic. I presume you’re familiar with writing object oriented PHP code and I will not explain every single step here. Anyways, I left some comments and hints in the code that may give you some orientation.
Working with blocks for the output
Alright, the functionality part is done, let’s now move to the output. Our aim is to influence the view of your template from inside the module structure, without needing to touch the template itself. Hence, you can deliver your module, including the functionality plus the display part completely encapsulated. Hooray updatability!
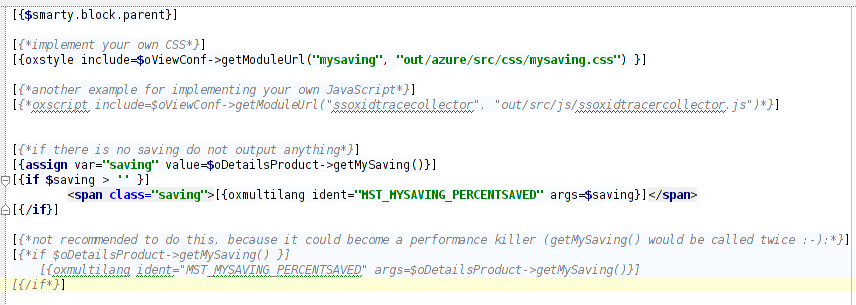
The template we want to alter is located in /application/views/azure/tpl/page/details/inc/ and is named productmain.tpl. Now try to find a predefined block close to where you want to place your output. In our example this block is named details_productmain_tprice. (Hint: if you cannot determine an appropriate block close to the place where you want to have your information displayed, please simply define a new block in your installation and send us a pull request on GitHub so we can implement it into the standard.) I now defined a new file details_productmain_tprice.tpl in /application/views/blocks/.
All of the information mentioned in the chapter above I had to declare in an array in the variable ‘blocks’ in metadata.php.
Again, I presume you are familiar with the Smarty template engine and left some (hopefully helpful) comments in the file:
Embedding your own CSS
Often it is useful to encapsulate your own CSS or even JavaScript in your module. As you can see from the example above, I placed the mysaving.css (for my very own font and a yellow background colour) into the folder /out/azure/src/css/.
Making your module multilingual
You probably already saw how to display multilingual descriptions of your module in the admin panel via meta data variables for your module.
But in the module itself – in case it is created for international use – you can set language keys in the block file like shown above. The single language key in my example is MST_MYSAVING_PERCENTSAVED and can be defined in the /translations/ folder of your module root. Please use folder names for the translations of your choosing according to the locales you defined in your OXID eShop. In my example, I translated into English (en), German (de) and Russian (ru).
The language file itself must be named something like *lang.php. So if you have to split your language files, it shall not be a problem for the shop magic to assemble these files into an array and display it properly.
Have a look at the content of these language files now. In the Smarty block template, we already assigned the $saving variable as an argument. This argument can be placed into the language files as %s. This is important as you can have a different word order in different translations. For example, Master Yoda would express himself like “You 24% have saved – harrharr”. In this case simply replace the “24” by the %s argument.
If you’d place the percent sign directly, unfortunately nothing would be displayed. This is why the program expects an argument (like %s) here. Try the entity % instead to get the percent sign to show up properly.
Install your module in OXID eShop
Of course you will know how it works already but for the sake of completeness:
- Copy the /mst/ folder including all sub folders into the /modules/ directory of your OXID eShop. Please preserve the given directory structure.
- Go to your admin panel -> Extensions -> Modules. You shall see the name of your module in the list. If not, you might have a problem with the rights on your server – set the appropriate rights according to your operating system so the web server at least can read your module directory and the metadata.php.
- Check the thumbnail picture, your description and title given etc. Make the necessary changes to your metadata.php if needed. If you’re okay, activate your module.
- In the store front, check if your module works like expected.
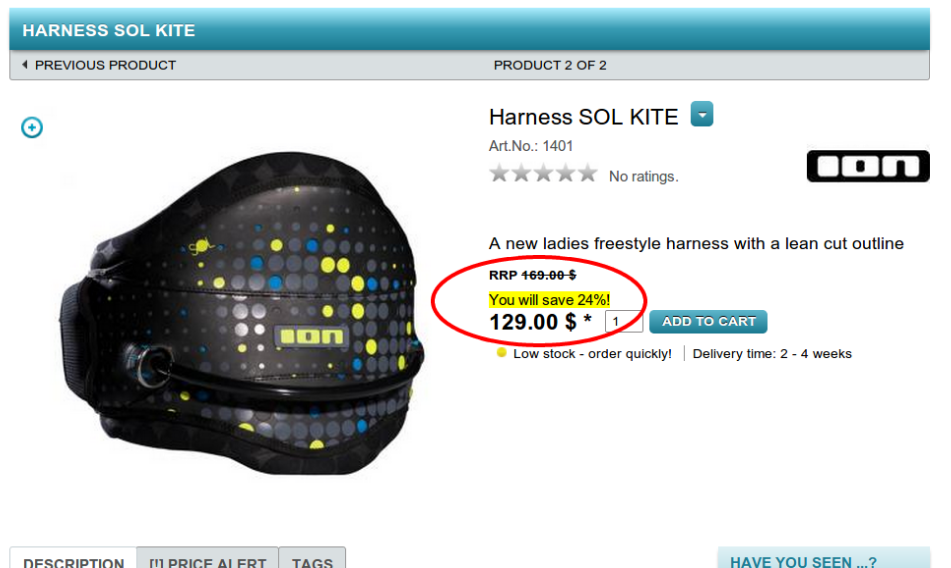
Looks alright, doesn’t it? By the way, you can download and contribute to this extension example by forking this working module from:
https://github.com/kermie/mysaving
Here are some additional hints to avoid common pitfalls:
- Clear your /tmp/ folder (Smarty cache) after every template change.
- You probably have to install and uninstall your own module more than once. Please make sure you confirm that previous entries shall be deleted from the database or use https://github.com/OXIDprojects/vt-devutils for cleaning up the database entries.
- If you need help with your module, please refer to the forums.
- If you want to publish your module under an open source license, upload it to your GitHub account and let community@oxid-esales.com know about it so we can fork it to https://github.com/OXIDprojects. This, might attract other users to help with the maintenance of your module.
- If you chose a commercial license and/or have the feeling that many people would be interested in your functional extension, publish it on OXID eXchange.
That’s it for today. I’ll probably publish some more tutorials/workshops about basic module writing soon(ish), stay tuned! I’d appreciate if you left a comment whether you like it or not, what to improve, which information is missing, which is too much etc.
Very nicely done Marco. Even I could follow along step by step. Your explanations are very logical, complete and easy to follow. I know nothing of Smarty or PHP but got the gist of the matter. When I learn a little more, I must make my own module (a simple one 😉 ).
I know a lot of time and effort goes into creating a tutorial like this.Thank you for sharing.
Thanks Ray! It took a while indeed, especially the part before I could start writing 🙂
[…] The only thing left is to add the metadata for your module and for your vendor information, maybe an additional icon for it. I described this in more detail in my former blog post “How to Write a Module for OXID eShop: Display “You will save x %” on the Product Details Page“. […]
Thank you for this great tutorial! I have followed each step but I unfortunately have an issue with the translation, that I can’t resolve. Instead of the expected line the output reads “ERROR: Translation for MST_MYSAVING_PERCENTSAVED not found!”, even with the version, that I downloaded from GitHub. I am using CE V4.9.5. Any idea?
Hey,
should definitely work with this OXID eShop version. Did you really clean your tmp/ folder?
[…] davon aus, dass Ihr wisst wie das geht. Falls nicht empfehle ich einen Blick auf z.B. dieses Tutorial zum Einstieg in die OXID Modulentwicklung von Marco […]
Great work, Marco. Thank you!!!